Getting started with E1
A simple but fully fledged mobile E1 app build with the Ionic Framework that can be used as a starting point for new E1 app development.
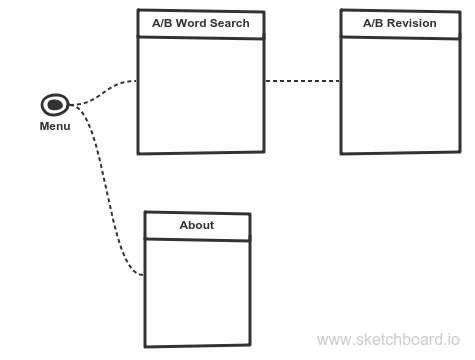
The key Hello E1 features are:
- A basic Ionic framework with paging menu
- The plumbings required for @ngrx and e1-service
- An About page that tests and stores the AIS url and optionally default user name and password
- An A/B Word Search page that demonstrates search & select requests
- An A/B Revision page that demonstrate inspect requests (read-only)
![]()
Prerequisite
First, have the latest recommended versions of Node and Visual Studio Code installed.
Install Ionic (might need sudo or administrator permission):
$ npm install -g cordova ionic
Installation
Download the source code and extract it into your project folder (hello-e1 is the original project folder name).
In the project folder, type:
$ npm install
To test if the installation was successful, type:
$ ionic serve
This command will build the app and open it up in your default browser.
Explore the code
To explore the code, open the project folder in Visual Code and expand the src folder, which is where our source code lives.
The app folder
Let’s start with a quick look at the app folder. This is where definitions and initialisation code for our app is stored (often referred to as the plumbings). The two files of interest are:
app.module.ts: Contains definitions of modules, pages and providers for our appapp.component.ts: The closest thing to traditionalmainfunction, this is where initialisation normally takes place, such as menu definition
Once established, the content of the app folder is typically only changed if new components, like page or provider is added, or new initialisation is needed.
The pages folder
The pages is where user interaction happens and subsequently the main functional area of our app.
A page can be thought of like forms in E1, providing a certain functionality and interconnecting with other pages.
The menu, as defined in app.components.ts, controls what pages the user has access to.
In our app, the user has only two pages to choose from, defined by:
    this.pages = [
      { title: 'A/B Word Search', component: AbWordSearchPage },
      { title: 'About', component: AboutPage }
    ];
The opening page, called the rootPage, is set to either page depending on the whether the app has already been configured with AIS url or not.
The ‘A/B Word Search’ page
The ‘A/B Word Search’ is our main page, a search & select like E1 form that uses P01BDWRD at the back-end. The page has only two functions:
search: Monitor the search-box entry and once it has 3 or more characters, makeAbWordSearchRequestto E1 (see E1 below for details).select: Call the ‘A/B Revision’ page for the selected address number.
The remaining code monitors E1 response and presents it on the page.
The ‘A/B Revision’ page
This page uses P01012_W01012A at the back-end (and takes it name from it – in case ‘Revision’ for a read-only page is confusing).
The only function of the page is to make AbRevisionRequest to E1 and present the result.
The ‘About’ page
The about page is where we configure our AIS url and optional user name and password and its only function is to validate and save the url.
The storage folder
Before getting to the e1 stuff, let’s quickly look at the storage folder.
Our storage requirement are quite simple, with the definition in defs.ts and related functions in service.ts.
The storage concept is document oriented as opposite to tables and rows with simple get and set functions. This makes perfect sense since a mobile app typically only needs to store configuration and intermittent data. Any serious data-crunching is the responsibility of the back-end. The speed of flash-storage should also make any complex database algorithms an overkill.
There is one ‘huh…’ thing here though for anyone new to Javascript, and that’s the peculiar Promise type. I don’t quite understand this myself, just starting to learn how to use it and putting my faith in all those Javascript people.
The e1 folder
This is where the interesting stuff is – that is if you come from E1 development background.
Let’s look at the files one by one.
The e1-helper file
An E1 app can be in one of three authenticated state:
- Not authenticated yet (no AIS token)
- Authentication timed-out (AIS token expired)
- Authenticated (valid AIS token)
To save us from having to test for the state every time we make a request, the E1HelperService does that for us, so we can boil our request to just a single statement. For example, the search request of the ‘A/B Word Search’ page is:
let search = new AbWordSearchRequest(searchEvent.target.value.trim() + '*');
this.form.request = search;
this.e1.call(this.form);
The first statement builds the request (see ab-word-search below) and the second assigns it to the request property of of the FormService, which is part of the e1-service.
The last statement then passes the FormService to the call function of the E1HelperService – and we’re done.
The ‘A/B Revision’ uses a slightly more elaborated statement:
form.request = new AbRevisionRequest(this.row.mnAddressNumber_21.value);
e1.call(form, {
    success: () => {
        this.data = store
          .select<IAbRevisionFormData>('server', 'formResponse', 'fs_P01012_W01012A', 'data');
    }
});
The first statement builds the request as before (see ab-revision below) and assigns it (whether to combine the two into a single statement or not is a matter of preference, whatever is more readable does it for me).
The call statement however has additional parameter that instructs it what to do once successful, which is to capture the data part of the response.
This again is a syntax that might puzzle Javascript newbies – and I’m talking from my own experience.
To try to explain this, lets look at the call signature second parameter’s type, which is:
export interface IServiceCallback {
    success?: any;
    error?: any;
    done?: any;
}
This can be read as a ‘class with optional three functions, success, error and done’. The call function will in return call each of these function upon successful execution, error and when it’s done.
In fact, Javascript is full of these ‘don’t call me, I call you’ patterns (Promise above is one of those). And when you think it, this makes a lot of sense for a language that’s designed to run on a single thread in a browser. The last thing you want is for the user interface to ‘hang’ while waiting for some function to return, that again is waiting for a server to respond.
I like to think of this as the ‘agent concept’ – which anyone who has ever applied for a job through a recruitment agency should appreciate (helps alleviate the initial frustration when trying to understand this).
The ab-word-search file
This is the definition we need for the P01BDWRD request and subsequent response unpacking.
Lets first look at the request:
export class AbWordSearchRequest extends FormRequest {
    constructor(search: string) {
        super();
        this.formName = 'P01BDWRD_W01BDWRDA';
        this.formServiceAction = 'R';
        this.formActions = [
            {
                controlID: '18',
                command: 'SetControlValue',
                value: search
            },
            {
                controlID: 15,
                command: 'DoAction'
            }
        ];
    }
}
The FormRequest class we extend (or inherit) is packed with the most of the properties we need to make a form request. At minimum we need to provide it with .formName and .formServiceAction In addition we need to set the ‘Word Search’ parameter which is controlID 18 and then press the ‘Find’ button which is controlID 15.
The second definition is for the form response:
export interface IAbWordSearchRow extends IRow {
    mnAddressNumber_21: IValue;
    sAlphaName_50: IValue;
    sPrefix_29: IValue;
    sPhoneNumber_30: IValue;
    sAddressLine1_31: IValue;
    sCity_32: IValue;
}

export interface IAbWordSearchResponse extends IFormResponse {
    fs_P01BDWRD_W01BDWRDA: IForm<IFormData<IAbWordSearchRow>>
}
We have a number of predefined interfaces like IFormResponse, IForm, IFormData, IRow and IValue that provide us with ‘scaffolding’. At minimum, we can define a form response as:
export interface ISomeForm extends IFormResponse {
    fs_APP_FORM : IForm<IFormData<IRow>>
}
Where ‘APP’ is the application name and ‘FORM’ the form name. The above definition doesn’t say anything about the form or grid row fields we expect from the response. To add a definition for grid row fields, we extend the IRow interface and replace it in the IFormData<IMyGrid> definition.
It should be noted that the response definition is not a requirement, but more of a guard to verify that we are getting the response we expected and helpful when we need to access the members in .ts files (the .html just throws an error or ignores incorrect members).
The ab-revision file
There are couple of differences in the P01012_W01012A request and response to point out. First lets look a the request:
        this.formInputs = [
            {
                id: '12',
                value: ab
            }
        ];
We pass the address book number as a form input id 12. We don’t do any form actions, but rely on the form’s logic to do the rest for us.
The second difference is that instead of grid row fields, we are now fetching form fields.
export interface IAbRevisionFormData extends IFormData<IRow> {
    txtAlphaName_28: IValue;
    txtAddressNumber_21: IValue;
    txtMailingName_38: IValue;
    txtSearchType_36: IExValue;
    txtABN_34: IValue;
    txtAddressLine3_44: IValue;
    txtAddressLine2_42: IValue;
    txtAddressLine1_40: IValue;
    txtCountry_56: IExValue;
    txtState_54: IExValue;
    txtCity_52: IValue;
    txtPostalCode_50: IValue;
    txtBusinessUnit_62: IExValue;
}

export interface IAbRevisionResponse extends IFormResponse {
    fs_P01012_W01012A: IForm<IAbRevisionFormData>
}
The difference is that instead of extending the IRow interface, we extend IFormData with a definition of the fields we are interested in.
Presenting the response
Finally, let’s look at how we present the response.
This is where Redux comes into play. If you run the app in Chrome with the Redux DevTools extension, you should be able to see something like this:
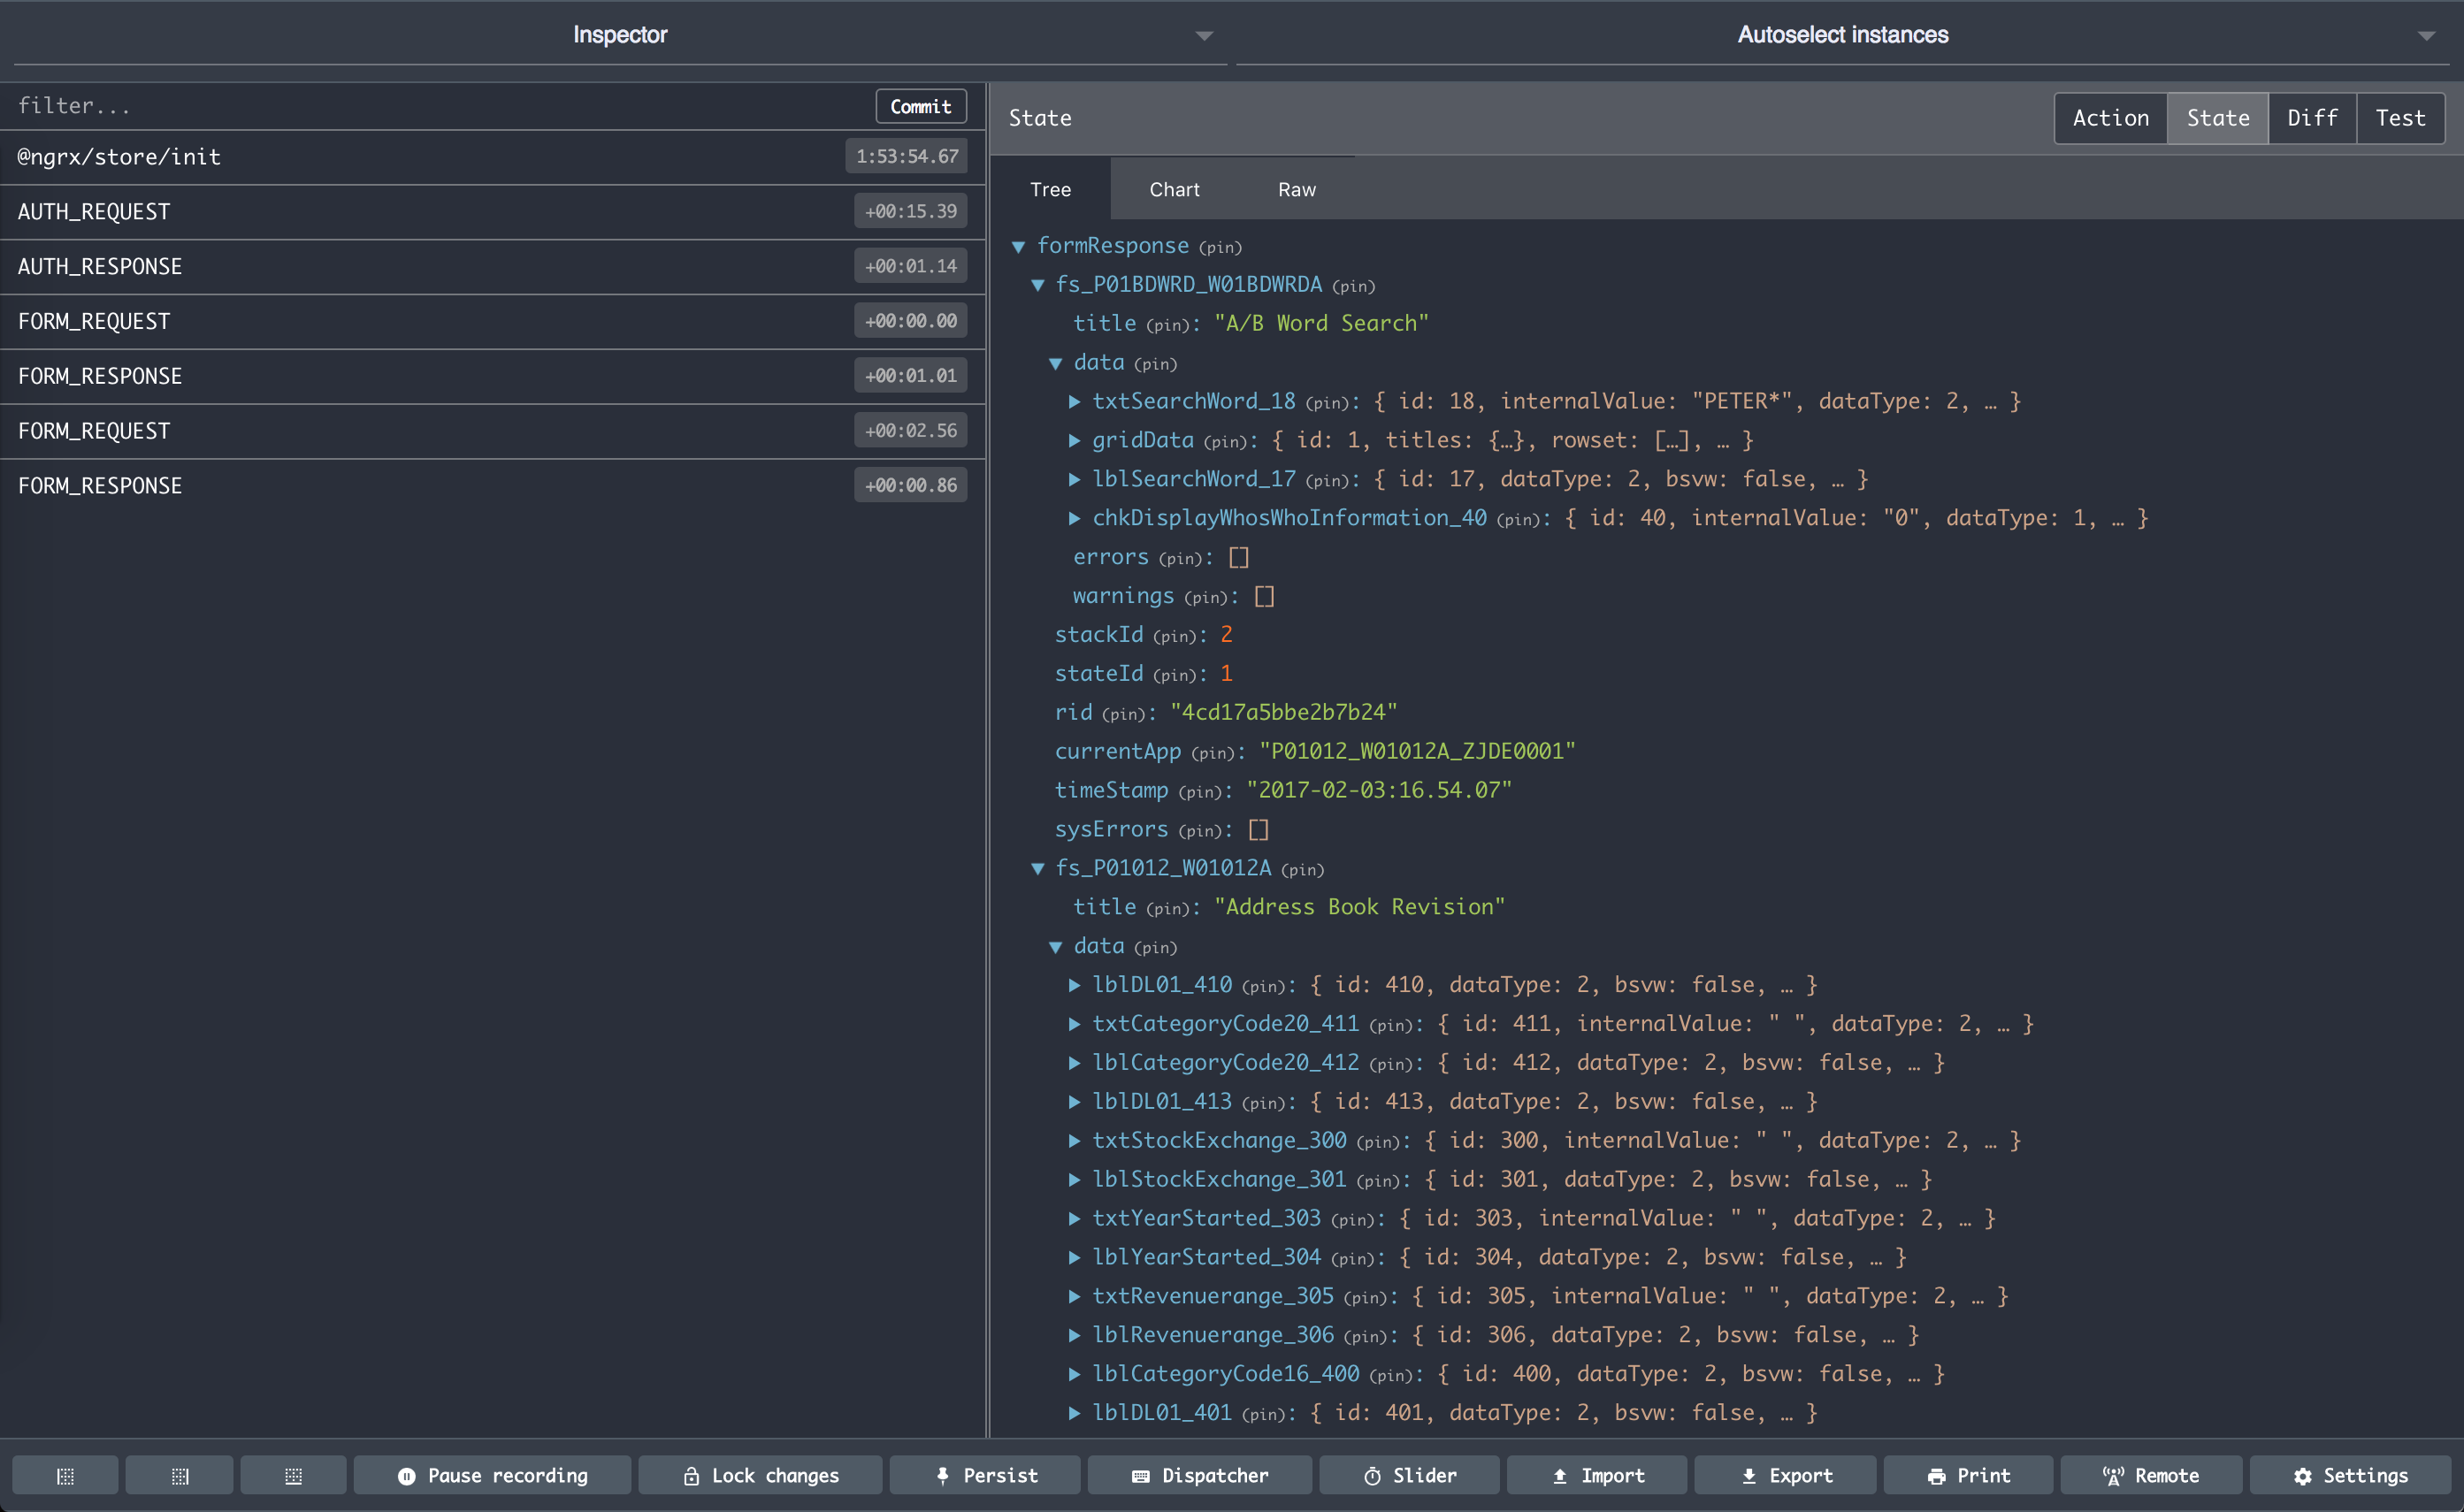
The response from our requests is kept in the Redux Store and we only need to add some code to extract the part we want to present. The ‘agent concept’ is a perfect fit here because we’re not interested until the data has arrived, and we use Observer type to look after this (think of it as the recruitment agent who waits by the phone for a prospective employer to respond – and then lets us know).
Our ab-word-search is only interested in the grid rows from fs_P01BDWRD_W01BDWRDA and this is how we access it:
  rowset: Observable<IAbWordSearchRow[]>  // <-- declare an Observable member
...
    this.rowset = store
      .select<IAbWordSearchRow[]>(...GRID_DATA, 'rowset');  // <-- assign it to the grid rows
The ...GRID_DATA is one of those clever Javascript syntax and it just says that we want to ‘spread’ the content of the GRID_DATA array, basically saves us from having to re-type:
    this.rowset = store
      .select<IAbWordSearchRow[]>('server', 'formResponse', 'fs_P01BDWRD_W01BDWRDA', 'data', 'gridData', 'rowset');  // <-- assign it to the grid rows
Now we can open our ab-word-search.html file and fill in the presentation:
    <button ion-item text-wrap *ngFor="let row of rowset | async" (click)="select(row)">
      <ion-label text-wrap>
        {{ row.sAlphaName_50.value }}
      </ion-label>
      <div item-content>
        {{ row.mnAddressNumber_21.value }}
      </div>
    </button>
The *ngFor="let row of rowset | async" statement is an Angular for statement where it repeats the <button> element for every element of our rowset (remember our agent by the phone).
The | async pipe syntax is needed to indicate that this an asyncrhonous variable.
We then display the sAlphaName_50 and mnAddressNumber_21 values for each row.
The code for our ab-revision is similar with interest in different part of the response:
        this.data = store
          .select<IAbRevisionFormData>('server', 'formResponse', 'fs_P01012_W01012A', 'data');
And the ab-revision.html presentation displays the data variable in similar way:
     <ion-item>
      <ion-label stacked>
        Mailing Name
      </ion-label>
      <div item-content>
        {{ ( data | async )?.txtMailingName_38.value }}
      </div>
    </ion-item>
The exception is:
      <div item-content>
        {{ row.mnAddressNumber_21.value }}
      </div>
      ...
      <div item-content>
        {{ row.sAlphaName_50.value }
      </div>
The row member is a normal variable (no agent involved), that was passed from the ab-word-search page, so we don’t need the | async pipe.
Conclusion
This concludes my Hello E1 introduction and I hope it has been informative.